It's October and that means it is totally acceptable to start decorating for Halloween! If you have little kids like me, you may want to keep in the "spirit" but you don't want your holiday decor to be too scary. We don't want anyone having nightmares. It's also a bonus to get the kids involved in any decorating projects so they feel like they are contributing too! Have fun with it.

When I saw this project, I knew we had to make it. Milk Jug Skeletons!! Cute Casper looking skeleton, anatomy lesson on our bones and how they connect, and reuse and recycle something that would otherwise be thrown into the landfills.
They are basically free to make using the left over containers you are already using. You can always ask your friends and neighbors to hang on to their milk jugs for you. We can literally go through 2 gallons a week, so it wasn't hard to gather 5 or 6 to make this cute Milk Jug Skeleton.
Be sure to clean out the jugs with soap and warm water then let dry completely. We don't need sour stinky vibes here. You will need the following supplies:
5 or 6 white Milk Jugs
Good scissors
White or clear Zip Ties
Black felt tip marker
Hole Puncher
Ribbon or string
Paper
Pencil
You will be cutting the milk jugs into the following parts:
The Skull - Use one whole jug. Flip the jug upside down and position the handle in the back. Position the corner of the jug down the middle of the face so it is balanced and angled like a face. Use the circle indentions as the eyes. Cut out 2 circles or what ever eye shape you like (Optional Ideas include Aliens, see options below). Cut out a nose shape in the middle. I went with a triangle shape. Now cut out the mouth. You can go detailed with teeth or just make a happy smile. Keep in mind the bend of the jug and don't cut too low because you won't see it.

The Rib Cage - Use another whole jug. With the jug upright, position the corner of the jug in the front. Draw lines with the marker down each side that look like ribs. It can be difficult to cut through the jug here without slipping and cutting the part you want to keep attached. So be aware and be careful here. I found piercing the scissors into the jug in the negative space that will be cut out and then following the lines worked best.
Two Shoulders - You will use 2 handles from 2 more jugs. Cut around each end leaving enough jug plastic on each end so you will be able to punch holes to connect them. You will also want to angle the cut on the end that will rest against the Ribs jug.
The Pelvis - Use one of the jugs you cut the handle off of. You need the bottom part of the jug. Cut a wavy line that gives rounded points on each corner and dips in the flat part of the jug. Punch a hole in one corner toward the left edge and one toward the right corner edge.
The Spine - Use the pour opening or spout of the jugs you cut up. You need 2. Cut a circle about 2 inches down from the spout. You will attach the 2 spouts together and use the circle base part to attach to the pelvis on the bottom and the ribs on the top.

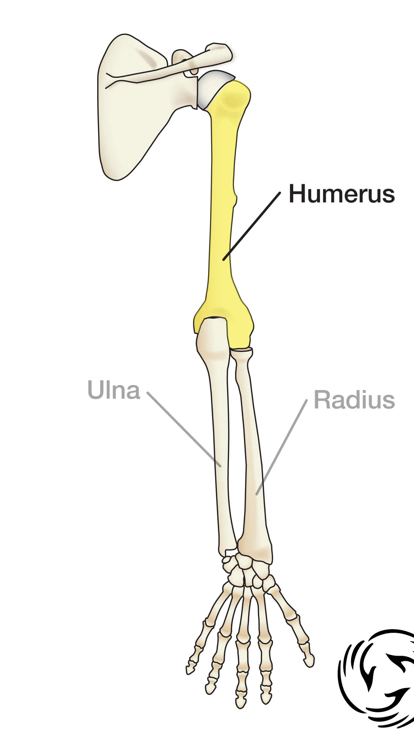
The Upper Arm or Humerus - You will need 2 from the corners of the jugs. You will want to cut out a long bone shape. Remember to leave room to punch a hole in each end.
The Lower Arm or Ulna and Radius - You will need 2 from the sides of the jug. Cut these in the shape of a bone with a cut out in the center. You will want it to look like 2 bones but its actually one piece. Punch a hole in each end.
The Upper Leg or Femur - You will need 2 from the corner of the jugs. Cut this bone longer than the arm bone. Punch a hole in each end.

The Lower Leg or Tibia and Fibula - You will need 2. Use the sides of the jugs. Same as the lower arm piece. Make a bone shape with a hole down the center. Punch a hole in each end.
Hands - This part is fun. Trace your child's hand on paper and cut it out. Use this as a template for the hands of your skeleton. Use the side of the jug where the circle indention is as the palm. You need 2. Punch a hole at the wrist near the edge.

Feet - Trace your child's feet on paper and cut out the shape to use as a template. Cut from the circle indention of the jugs. It gives a nice curve to the foot. You can always use a flat side too. You need 2. Punch a hole in the heel near the edge.
Time to connect your bones! This reminds me of that song... The foot bone connected to the leg bone...wait - Haha. String your Zip Ties into the punched holes and connect the pieces. Trim any extra tails. The Spine and Neck areas can be tricky to connect. Punch a hole on each side of the Spout area. You can configure the zip tie to hide inside these sections when connecting. You will want it secure. For the Skull and Ribs jugs, punch your holes in the spouts on each side. This will look like the neck or spine. Thread the zip ties into the jugs and secure on the left and then the right. Move the bulk of the zip tie into the inside of the jug so you don't see it.
Punch a hole in the shoulder part of the Ribs Jug. Thread the zip tie into the hole and through one of the shoulder bones. Secure and repeat on the other side. Attach the upper arm and lower arm and hand with the zip ties. Repeat on the other side.
To connect the legs to the pelvis just make sure they are on opposite sides and facing forward. Go ahead and secure the upper leg and lower leg and feet with the zip ties. Repeat on the other leg.
Hang a loop of string or wire to the handle on the back of the skull and hang outside in a tree or on a shepherd's hook in your yard or garden (great scare crow) or from the top of your porch. Your Milk Jug Skeleton is complete!
Options are to decorate the skeleton with ribbons or glitter or glow in the dark paint. We gave ours a festive bow tie. You can add glow sticks inside the jug parts to really make it glow! A fun idea is to make one into an alien and spray paint it grey or glowing green! Have fun with it. We loved making these and I hope you do too. Happy Halloween!
No comments:
Post a Comment